Pages

4 November 2010

Crunch time


Yes it’s that glorious time of year where everything gets just a little bit crunchy. The trees are changing colours and soon we’ll be wading through pavements and fields knee deep in crisp golden leaves, clear blue skies overhead and clouds of condensing breath in the air. The seasonal produce on offer from stores, markets and farm shops reflect the colours and hues of the season: golden and purple swedes, burnt orange pumpkins, moss-like kale leaves, frosty white leeks and deep green crinkled cabbage. It’s the time of year when traditionally our thoughts turn, quite rightly, to warming soups, stews, compotes and deep rich meats and game with distinctive earthy flavours but there’s still time for something a little lighter and fresher. In this crisp and crunchy salad-come-autumnal-coleslaw you'll find a refreshing, tangy, Asian twist that is the perfect compliment to the season. 

Try adding bean sprouts, noodles or both, maybe some stir fried crispy chunks of chicken or serve this coleslaw, as is, along side some roasted pork belly with crackling. The dressing would make a perfect marinade for fish too: sticky, sweet and sour.

Winter coleslaw with Asian dressing


Serves:4

  • ½ a cabbage, green or white shredded
  • 3 carrots coarsely grated
  • 2 apples grated
  • 1 red pepper finely sliced
  • 2 tbsp of crushed roasted peanuts

Dressing
·       1 clove garlic crushed
·       ½ onion finely chopped
·       1 red chilli chopped
·       1 tbsp of thai fish sauce
·       11/2 tbsp of brown sugar
·       3 tbsp of lime juice
·       a dash of sweet chilli sauce


Put all the raw vegetables chopped, sliced or grated in a large bowl. Mix all the dressing ingredients in a blender and blitz for a few seconds. Pour the dressing over the veg and toss well, serving with a sprinkle of the crushed peanuts.


2 November 2010

Smashing pumpkins


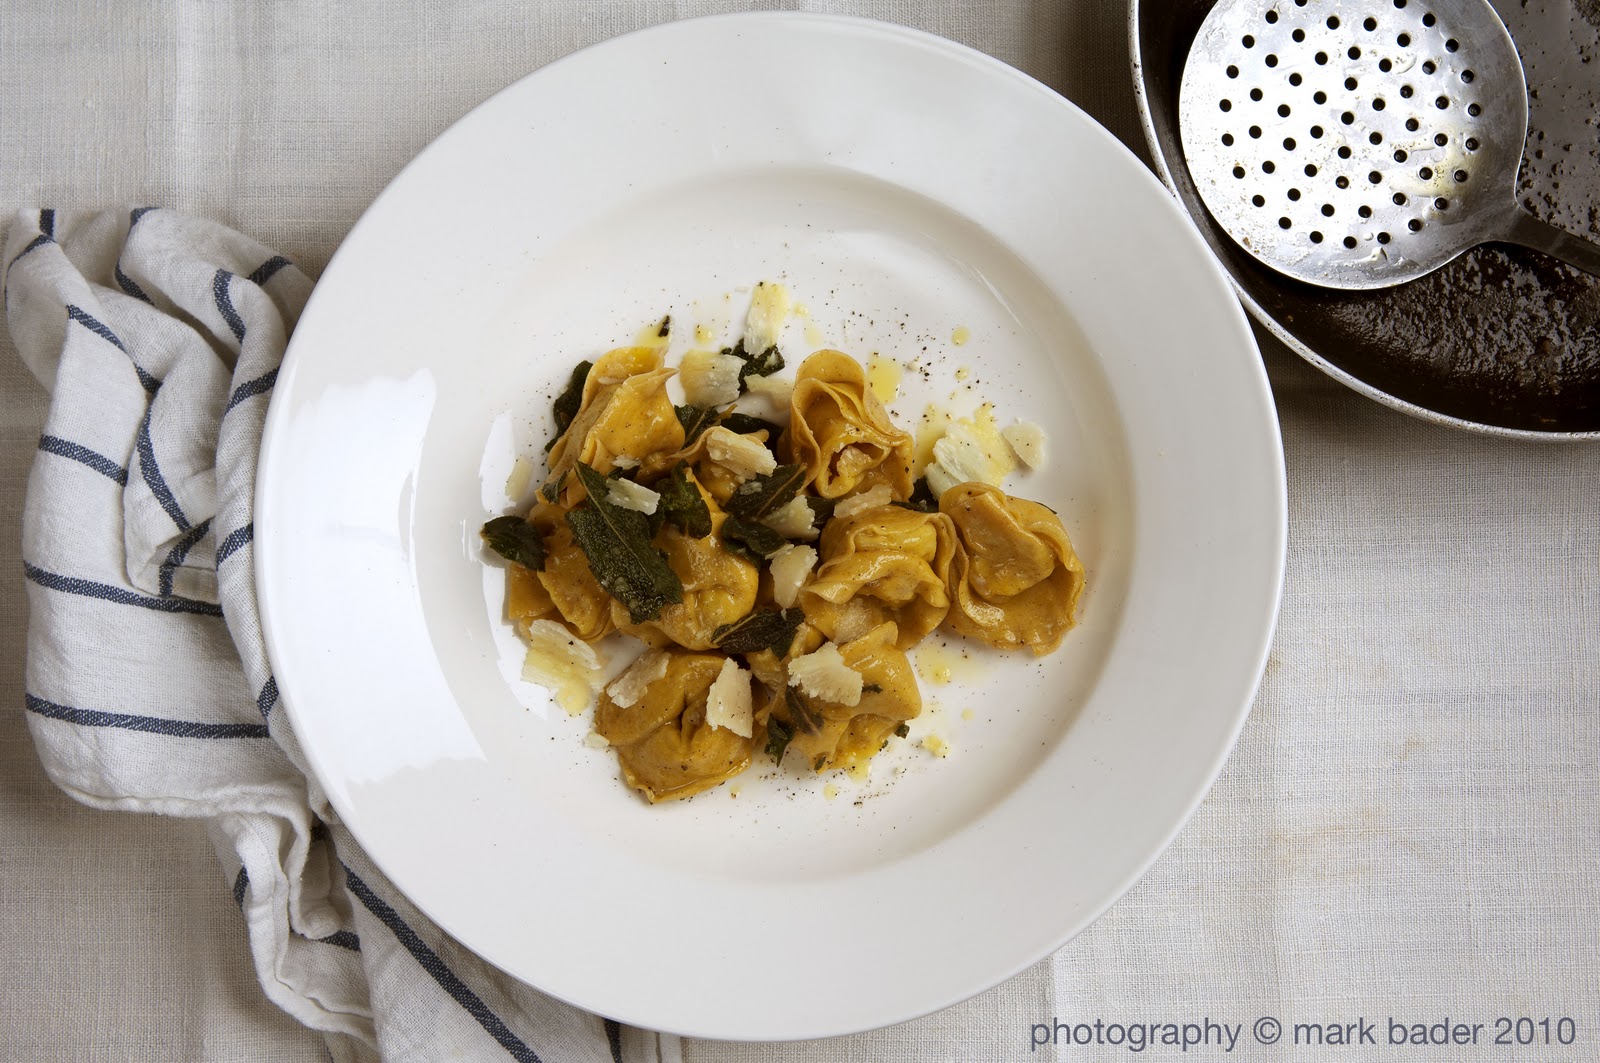
Halloween having just passed we naturally find ourselves with a slight excess in the pumpkin department: even though the living room is abundantly decorated with triangular cut, slanty eyed faces that the kids have enthusiastically carved, glowing and glowering, on shelves, mantles and in obscure corners, the room is filled with an autumnal aura … and an acrid smell of burning vegetable flesh. Every year I try to ‘do’ something with pumpkin, I’ve experimented with pumpkin pies, pumpkin soups, roasting and mashing the golden flesh, but have come to the conclusion that none of the above really excites me that much. Pies are often glutinous and any pumpkin flavour is masked by nutmeg and cinnamon, not a bad thing as it turns out, but then I question as to why include the pumpkin in the first place. Soups are never quite ‘there’ for me: I only once had a decent soup but again the over riding flavour was celery this time, whilst warming and an attractive colour the pumpkin seemed to be lurking around rather than bursting out. Lets face facts, pumpkin isn’t the worlds most flavoursome ingredient: despite being one of the most popular crops in the United States of America where about 1.5 billion pounds are cultivated each year. It does however have quite an interesting texture if handled in the right way and this year I stumbled upon a pasta recipe that seems to finally do the pumpkin proud. The trick is to roast thick slices of pumpkin with the skin intact then, when tender and almost cooked through, scrape the flesh into a sieve or colander and let it drain and dry overnight (for at least the best part of the day). The true genius in this recipe though is the way the pumpkin flesh, now mashed coarsely, is combined with pear and parmesan cheese and a little garlic to create a tangy, sweet, textured and delicious filling for tortellini pasta. Squash and pasta are old and well acquainted partners; think of butternut and sage for instance, both as a filling and as a fantastic variation for gnocchi. This recipe for the pumpkin is similar in the fact that the dish is finished with a smoky sage and butter sauce but the texture and the fresh fruity finish are quite unique. 

Pumpkin & pear tortellini


Serves: 4

For the filling- the day before

  • 1 pumpkin, about 2kg
  • 100g grated fresh parmesan cheese
  • 100g pear flesh, grated
  • 1 clove garlic, crushed
  • Salt & pepper

For the pasta
  • 300g tipo ‘00’ flour
  • 3 eggs
  • 1 tspn of turmeric

For the sauce
  • 100g butter
  • A handful of sage leaves
  • Half a cup of vegetable stock


Cut the pumpkin into wedges, deseed and place in a roasting tin, sprinkle with salt and roast at 180degrees for about 45 minutes or until just tender. Allow to cool and then scrape the pumpkin flesh into a sieve or colander, place a plate or saucer on top and rest in a bowl to allow any excess liquid to drain from the flesh. This should be left for at least 5 hours but if the pumpkin seems very wet then leave to drain overnight. When thoroughly dry place the pumpkin flesh in a bowl and coarsely mash or place in a blender and blitz. Add the Parmesan cheese, pear, garlic and season well with salt & pepper.


There are so many pasta recipes so find one you can work with, the process and technique is pretty standard, I add the turmeric to give the pasta a deep yellow colour. Fill your rolled out pasta with the pumpkin filling, shape into tortellini and leave to air until needed. Cook in plenty of boiling salted water for about 4 mins. Melt the butter in a frying pan; add the sage leaves and fry for a minute, splash in the stock and season. When cooked toss the tortellini in the sage butter sauce and serve immediately.

27 October 2010

Riverford at Pines Gardens


Dover, Kent was the location for the latest demonstration for my friends at Riverford organics , the veg box people. Once again we were inspiring new ideas and some innovative methods of cooking some of the , well , less exciting veg that heralds in the new autumn season, the much maligned Swede for instance. Autumn also has a treasure-trove of delights in store and is quite possibly my favourite food season. Much as in spring when purple sprouting broccoli is available for the first time , Kale brings a similar frisson of excitement with it's arrival in the weekly box. This week it was the deeply gorgeous long leaves of Cavalo Nero but soon curly Kale will be in abundance and I shall indulge.

The main focus of this weeks demonstration was Swede though and sage seemed to be the appropriate partner. Try roasting Swede seasoned with salt and pepper, some chopped sage leaves and roasted in the over for 20 minutes or so and serve as an alternative to roast potato. Using a very similar method , only chopping the Swede into more delicate pieces a risotto of roasted Swede and sage butter drizzle was a real hit with both lovers and haters of this golden and fleshed root.

Roast Swede and sage risotto


Serves: 4
  • 250g Arborio rice 
  • 750ml Vegetable stock 
  • 3tbsp olive oil 
  • 1 white onion finely chopped 
  • 1 celery stick, finely chopped 
  • 150g grated parmesan cheese 
  • 1 garlic clove crushed 
  • 1 lemon juiced 
  • 1 glass of white dry wine 
  • 30g butter 
  • Salt & pepper 

Heat the oil in a heavy based pan and gently fry the onion & celery for a few minutes. Add the crushed garlic clove stir in for a minute or two and then pour in some more olive oil and add the rice. Cook the rice for a few minutes until the rice absorbs some of the oil and starts to puff a little. If you are using wine this is the time to add it to the pan and heat until absorbed into the rice. Now start adding the stock, just cover the rice and stir whilst it is absorbed and then repeat. Keep cooking until the rice is nearly done but still a bit ‘husky’ and now add the lemon juice, season with salt & pepper and keep cooking adding more stock as required until the rice is al dente. Remove from the heat, stir in the Parmesan cheese cover and let it sit for five minutes, before adding flavourings.

Roasted Swede & sage: 

  • 1 medium Swede 
  • a handful of fresh sage leaves 
  • a few spinach leaves , washed and dried 
  • olive oil 
Cube the Swede into 1cm pieces, drizzle with olive oil, season and add a handful of chopped sage leaves, mix together and roast in the oven at 180 degrees for 20 mins or so. Add the roasted Swede to the risotto with a handful of spinach leaves and while the risotto is resting, fry some sage leaves in butter until crisp. Serve the crisp leaves on top of the risotto and drizzle with the butter.

Event photos by Chrissy Asteraki-Speer

6 October 2010

Humble roots


We had a bit of a glut this week, Carrots, that most humble of root vegetables, they seemed to be everywhere. We hadn’t even started on the bunch that came in last weeks veg box when another bunch turned up all fresh and perky in this weeks offering. There were a few still left over from the week before and in a major failing of my faculties I actually bought yet more whilst out food shopping; just because they were the right shape, you know those delicious little baby Chantenay carrots, I wanted them for a version of Coq-Au-Vin I was cooking mid week and thought they’d look good in the dish. So due to this slight over run of the gloriously humble Daucus carota I found myself searching around for a few recipes to appease, not only my shopping guilt but the excess.

There are of course many ways to cook a carrot and nothing better than to boil until just tender, drain and then glaze with butter, a little sugar and serve sprinkled with fresh chopped Parsley. We call these ‘naughty carrots’ at home and in a stroke of genius and by employing a degree of psychological warfare the kids were wooed into eating them by simply designating them as ‘naughty’ (due to the sugar & butter content), all kids like something naughty and this system worked a treat and we still refer to this dish by the same name today. In an aside to this: we once convinced my son, probably aged two (poor lad had no idea) that sparkling mineral water was ‘white coca-cola’, another battle won by simple psychological techniques, worked until he went to nursery school and started mixing with other better informed children who were already indoctrinated in the delights of ‘the real thing’!

There is always a soup I suppose, a classic way to relieve oneself of an overflowing supply of vegetables, but today I fancied something a little more tantalising and something to accompany some slow roasted lamb shoulder that was oozing and spitting in the oven. I was thinking of a Greek flavour or an exotic North African spicing that would go perfectly with the lamb. Once again Ottoleghi’s Plenty came to the rescue with a very simple Moroccan spiced carrot recipe that I instantly suspected could be adapted in several ways. The basic idea was simple, we like that, par-cook the carrots, fry some onion and spice these with cumin, cinnamon, ginger, cloves, chilli and garlic, return the carrots, stir together and eventually serve with some fresh coriander and an indulgent dollop of Greek yoghurt drizzled with your best olive oil.


Moroccan spiced carrot salad


Serves: 4

  • 1 kg carrots 
  • 100 ml olive oil 
  • 1 onion finely chopped 
  • 3 cloves of garlic 
  • 2 green chillies 
  • 1 pinch of ground cloves 
  • 1 pinch of ground ginger 
  • 1 pinch of ground coriander 
  • 1 tsp of ground cinnamon 
  • 1 tsp sweet paprika 
  • 1 tsp ground cumin 
  • 1 tbsp white wine vinegar 
  • 1 tbsp of chopped preserved lemon skin (if you have it or the grated zest of a lemon 
  • Juice of 1 lemon 
  • 1 handful of fresh chopped coriander 
  • Greek yoghurt to serve 
  • Salt & pepper 
Wash, peel and cut the carrots into 1cm thick batons about 3 cm in length. Cook in slowly boiling salted water until just tender but retaining some degree of crunch. Drain and allow to cool.


In a frying pan soften the onion in olive oil until just starting to colour, sprinkle in all the ground herbs, the chopped garlic, finely chopped chillies, white wine vinegar and lemon zest and continue cooking for a few minutes until all the flavours are combined and the onion is browned and golden.

Return the carrots to the onion mixture and mix thoroughly so all the carrots are coated in the onions and spices. Remove from the heat and allow to cool. Just before serving stir through the chopped coriander and serve in individual bowls with a spoon of Greek yoghurt and a drizzle of olive oil.


I was cooking at a music festival the other week and used this basic recipe to create a couscous dish that could be pre-prepared and taste good all day. It turned out to be a real hit and I have prepared it a few times since. It follows the same basic principles as the Ottolenghi dish above but combines couscous, mint & raisins to make a sweet and spicy warm (or cold) salad that is great as an accompaniment to meats or is an ideal lunch box recipe.


Moroccan spiced carrot couscous


Serves: 4

  • 1 kg carrots
  • 150g couscous
  • 100ml olive oil
  • 1 onion finely chopped
  • 3 cloves of garlic
  • 2 green chillies
  • 1 pinch of ground coriander
  • 1 tsp of ground cinnamon
  • 1 tsp ground cumin
  • Juice of 1 lemon
  • 1 handful of fresh chopped coriander
  • 1 handful of fresh chopped mint
  • 1 handful of the best raisins you can afford
  • Salt & pepper

Wash, peel and cut the carrots into 1cm thick batons about 3 cm in length. Cook in slowly boiling salted water until just tender but retaining some degree of crunch. Drain and allow to cool.

In a frying pan soften the onion in olive oil until just starting to colour, sprinkle with all the ground herbs, the chopped garlic, finely chopped chillies and continue cooking for a few minutes until all the flavours are combined and the onion is browned and golden.
Return the carrots to the onion mixture and mix thoroughly so all the carrots are coated in the onions and spices. Remove from the heat and allow to cool.

Put the couscous in a large bowl, sprinkle with salt and cover with boiling water. Put a lid on the bowl or cover the bowl with cling film and leave to stand for 10 minutes. After ten minutes ‘fluff’ the couscous up with a plastic fork and drizzle in a little olive oil and lemon juice just to help the grains separate. Stir in the chopped mint and coriander, season to taste with salt & pepper and add more lemon juice if required. Now add the carrots and onion mixture and the raisins and stir all the ingredients together. Adjust the seasoning to taste, add more chopped herbs and lemon if required then place in into a large serving dish.  


8 September 2010

Get with the Beet !


Second helpings are always a good thing and there is no exception in the case of the deeply delicious beetroot. Normally and probably quite rightly one associates the deep earthy flavours of this particular purple bulb with the autumn, but in fact these roots are available pretty much all year: bar a brief holiday from April till June. It therefore comes as a complete delight to find what appears to be a second crop available just now, but this is really the beginning of the season that began in late June and will now continue through till next February or even March. The beets available now are smaller, sweeter and cook more easily than those larger ones available in the winter month’s, which can sometimes have a tough woody core.


There are many ways to prepare and eat beetroot but I find the best place to start no matter what recipe I am intending to follow is to roast the beets in the oven until tender and from there I can do what ever I so desire with ease. I have noticed that many cook books instruct a roasting of around 45 minutes, this in my opinion is a complete fallacy, I can’t remember ever being able to roast a beet from raw to tender in this time, an hour and a half maybe, but never much less than an hour, so bear this in mind before starting any recipe involving beetroot.

My preferred method is quite simple, produces a deep rich colour, flavour and velvety texture, let alone a delicious aroma that will fill your kitchen making you instantly and ridiculously hungry. Simply remove most of the roots and stalks from the beets, scatter a good handful or two of sea salt on the bottom of a large sheet of foil, place the washed and dried beets onto the bed of salt, wrap the foil up tightly and place on a tray in a preheated oven at 180 degrees. As I said you can expect this process to take around 90 to 120 minutes depending on the size and age of your beets. You can always test them with a skewer after an hour and see how they’re doing. When completely tender, allow them to cool and then rub off the skins with your fingers ( wear some rubber gloves if you don’t want stained fingers) and trim off the stalks and roots.

Now you have a delicious cooked beet that can be added to salads, pan-fried with carrots and balsamic vinegar, made into deep velvety soup that can be eaten hot or cold and even used to make a surprisingly good, moist cake.

I am a huge fan of the beet and find it a complete joy to cook with. I love the way it partners so well with fruit and in these two recipes I do exactly that. The soup is a delicious alternative to Borscht, the apple lightens and sweetens and this version is equally good hot or cold. The salad is simply wondrous, tangy, salty (from the olives) and sweet from both the beets and the fruit. It looks quite stunning too and is super simple to make.

Beetroot , orange and olive salad


Serves: 2
  • 400g beetroot 
  • 2 sweet blood or blush oranges 
  • 50g black dried pitted olives 
  • ½ a small red onion very finely chopped 
  • 1 tbsp red wine vinegar 
  • 3 tbsp olive oil 
  • Flat leaf parsley chopped 
  • Salt & pepper 

Prepare the beetroot by washing, trimming off the long stalks and sitting them on a bed of sea salt wrapped up inside a piece of foil. Place them in a pre-heated oven at 180 degrees and roast for at least 90 minutes or until completely tender when pierced with a skewer or sharp knife. Allow to cool for a while, and then remove the stalks and skins, slice into wedge shape pieces and place in a large mixing bowl.

Cut the skins from the oranges by slicing off the ends and cutting down the sides of the fruit to reveal the flesh, thus removing any pith, cut out the segments of orange from in-between the membranes and put the segments and the juice in the same bowl as the beetroot.

Add all the other ingredients: olives, onion, olive oil, red wine vinegar and chopped parsley to the bowl, mix the salad together, season with salt & pepper to taste and serve on a large platter. 


Beetroot, apple & celery soup


Serves: 4

  • 1kg Beetroot (roasted)
  • 500g Apples
  • 1 large onion
  • 1 Celery stalk
  • 200ml white wine
  • 1 tbsp Demerara sugar
  • 1.5ltr vegetable or chicken stock
  • 2tbsp olive oil
  • Salt & pepper
  • Crème fraiche
  • Chives


Wrap the beetroot in foil and roast in the oven at 180 degrees for an hour or until tender, peel the skins off the beets and slice. Sweat the onion and celery in a large pan in a little olive oil. Peel, core and slice the apples add these to the pan and cook down for a while. Add the sugar, white wine and cook for a few minutes more until all the ingredients are combined. Pour over the stock, season and simmer gently until everything is thoroughly tender and cooked through: about 30 mins. Allow to cool for a little while and then place in a food processor and blitz into a smooth soup. Return to a pan, heat gently and then serve with a swirl of crème fraiche or sour cream and a scattering of finely chopped chives or dill if preferred. This soup is excellent served chilled.


26 July 2010

More green issues ...


Baking has never come completely naturally to me, not like my mother or grandmother who both seem to bake so effortlessly, no, it has always been a bit of a recipe following exercise as far as I am concerned. Bread I’m OK with, I’ve practised enough to have developed a ‘feel’ for it and I like the scientific element to the whole process. So I was somewhat surprised in myself as to why I was drawn to these little pancakes when I was looking for something new to try.

It started with a beautiful bunch of organic Spinach that had arrived on my doorstep courtesy of my weekly Riverford veg box. I was browsing through the cook books to find something interesting and new to do with this wonderful bag of bright green leaves, when I stumbled upon this recipe in my new Ottolenghi book Plenty. For some reason this recipe just jumped off the page, not too fussy and plenty of room for a more rustic method, and so, as if by fate, green spinach pancakes it was!

I was considering augmenting these delightful pancakes with some chopped up bacon or pancetta but in the end I left well alone and followed the recipe. These would make a great brunch or breakfast dish, served with a tomato relish maybe, or just eat them straight from the frying pan as I did, fold them in half and munch like a sandwich, absolutely delicious!

Green Spinach pancakes
(from Ottolenghi Plenty)


Serves: 2

  • 300g spinach
  • 1 egg
  • 1 tsp cumin
  • 4 spring onions chopped
  • 1 green chilli chopped
  • 150ml milk
  • 110 self raising flour
  • 1 tbsp baking powder
  • 50g butter, melted
  • Sea salt
  • 1 egg white
  • Olive oil

Wash and dry the spinach then wilt in a dry pan over a medium heat. When soft place the spinach in a roll of kitchen paper and squeeze out as much water as possible. Lay the spinach out on fresh paper for a while then roughly chop and set to one side.


Place the flour, baking powder, whole egg, salt, cumin, in a bowl and whisk until a smooth. Add the chopped chilli and spring onions and stir into the pancake mix. Now stir in the spinach and season well, then, whisk the egg white to stiff peaks and fold this into the pancake batter.

In a hot non-stick frying pan drizzle some olive oil and add two tablespoons of the pancake mixture into the fat. Pat down a little so the pancakes don't get too thick and cook more evenly. Fry for two minutes on each side until golden and cooked through. This recipe makes about 6 pancakes.


25 July 2010

You could call this Ratatouille


Aubergine, Courgette and Tomato, such a classic combination of ingredients, used all over the world by different cultures to produce stunning full flavoured dishes that never disappoint. This is a really easy and somewhat refined version of a Ratatouille, but by cooking each ingredient individually it retains much more of each elements intrinsic qualities.


Ratatouille ... my way


  • 1 Medium Aubergine
  • 2 Courgettes
  • 200g Cherry Tomato 
  • 1 glass of white wine
  • 1 tbsp of tomato puree
  • 100 ml water
  • 1/2 a garlic clove , crushed
  • 1 tbsp of chopped flat leaf parsley
  • 1 tsp of dried oregano
  • 1 tsp sugar
  • olive oil
  • salt & pepper
Cut the Aubergine into thick chunks and fry in a little olive oil in a very hot pan until they are charred but not burnt, set to one side on a piece of kitchen paper.


Slice the Courgette into batons and in the same way as the Aubergine fry the batons until brown and golden . Set aside on a piece of kitchen paper


In a saucepan over a medium heat put the white wine and tomato puree, stir well together and cook off the wine for a few minutes. Add the sliced cherry tomato's, crushed garlic, sugar, dried oregano and season well. Top up with a little of the water as required and simmer down for a few minutes to thicken.


Now stir in the Aubergine and Courgette, toss around in the sauce, place a lid on the pan and gently simmer , stirring once, for 8-10 minutes. Keep an eye on the pan though as you don't want the vegetables to over cook and lose their colour and texture. Stir in some chopped parsley just before serving in a big bowl. Great as a lunch dish with crusty bread , a terrific side to slow roast lamb or as a salad.