As we move with wistful enthusiasm into what is now hopefully spring, it hardly seemed appropriate to be cooking a hearty winter reapas ! Watching Paul Hollywood's bread program on TV the other night however inspired me to cook this dish. I had never cooked a cobbler before but it combines a beef stew ( I used my Daube recipe ) and bread, two things I love , so I thought i'd give it a go before the slightly warmer weather gets everyone in the mood for lighter, simpler delights. It turned out to be a real crowd pleaser, serve with just a crisp green salad or as we did with some buttered spring greens. You'll find the recipe here
Pages
22 April 2013
9 April 2013
super soda
Lightly spiced Carrot & Parsnip soup with homemade soda bread.
This made a perfect Saturday lunch and used up some excess Carrots and Parsnips that had been lurking in the bottom of the veg box. I don't need to tell you how to make soup now , do I ? So here's a list of ingredients: carrots, parsnip, leak, onion, chicken stock , toasted cumin, coriander & fennel seeds and finished with some fresh coriander.
I've always loved soda bread but had never made it before. So, having seen it on an episode of Masterchef; of all places, I thought i'd give it a go. To be honest it couldn't be simpler and if you're fresh out of bread, happen to have the ingredients in the cupboard and have a spare 35 minutes then this is perfect.
175g self raising flour
175g wholemeal flour
tsp bicarbonate of soda
1/2 tsp salt
290 ml of buttermilk
porridge oats
Simply combine the flours, bicarb and salt in a large bowl. Make a well in the centre and pour in the buttermilk, stir together quickly to form a dough and then turn out on a dry surface and kneed for just a couple of minutes to bring everything together. Form into a rough shape, roll on the oats and bake in the pre-heated oven 200c for about 30 mins. Done.
Labels:
buttermilk,
carrots,
fennel,
mark bader,
parsnips,
soda bread,
soup
25 March 2013
Jerusalem
Jerusalem Artichokes: This one is a bit of a 'love or hate' but i love 'em , they're nutty little nuggets and much more versatile than you'd think. For me though simplicity is key and this dish is simplicity personified. Sautéed the artichokes in olive oil with garlic . bay and finish with some lemon juice. Simple, as the best things often are.
Labels:
artichoke,
bay,
garlic,
jerusalem,
mark bader,
riverford organics
13 March 2013
Huba Baba
This is a beautifully simple dish of Lentils, tomato, red peppers and a delightfully smokey scoop of babaghanoush on top. I just can't get enough of this right now.
Lentils with tomato & babaghanoush
Serves: 4
for the lentils
400g green or puy lentils
1 carrot, peeled and quartered
2 bay leaves
1 clove of garlic peeled
1 onion peeled and quartered
2 tbls chopped red pepper
1 tbls harisa paste
lemon juice
chopped parsley & coriander
rinse the lentils well under cold water and put them in a large pan. Put the carrot, bay, onion and garlic in the pan and cover all the ingredients with plenty of water. Bring to the boil and then simmer for about 25mins until the lentils are cooked. Drain, remove the bay. carrot, onion and garlic. Season the lentils with some olive oil , salt & pepper and set the lentils on one side.
for the tomatoes
400g cherry tomatoes, cut in half
4 tbls extra virgin olive oil
thyme or oregano
salt and pepper
4 tbls extra virgin olive oil
thyme or oregano
salt and pepper
put a pan on a medium heat, add the oil and then the tomatoes. Season well , sprinkle with the herbs and cover. Simmer for 10-15 mins until the tomatoes are cooked but still hold their shape. Set aside to cool
for the babaghanoush
2 large aubergines
4 tbls of tahini
2 garlic cloves crushed
1 lemon juiced
some cold water
heat the oven to at least 220c . Cover a baking tray with foil and put the aubergines on the tray and in the oven. Leave space between them so they don’t stick and they get a good even heat. Roast for about 30-45mins or until they are dry and cracked on the outside and a knife passes easily through. Set aside until cool enough to handle and then cut in half and scoop the flesh into a sieve and allow to drain for ten minutes then place in a bowl. Add the garlic, tahini and lemon juice in a bowl and whisk until smooth and creamy but not too loose. Adjust with water if necessary. Combine this mixture with the drained aubergine pulp and mix thoroughly together with a spoon. Season and adjust the lemon.
Mix the tomatoes into the lentils and stir in the red pepper, harissa, squeeze in the lemon juice and season to taste. Finally mix in a good handful of the chopped herbs and maybe some more olive oil. Spoon out onto a large serving dish. To finish: spoon the babaghanoush over the top and drizzle with a little more oil.
mark bader photography
for the babaghanoush
2 large aubergines
4 tbls of tahini
2 garlic cloves crushed
1 lemon juiced
some cold water
heat the oven to at least 220c . Cover a baking tray with foil and put the aubergines on the tray and in the oven. Leave space between them so they don’t stick and they get a good even heat. Roast for about 30-45mins or until they are dry and cracked on the outside and a knife passes easily through. Set aside until cool enough to handle and then cut in half and scoop the flesh into a sieve and allow to drain for ten minutes then place in a bowl. Add the garlic, tahini and lemon juice in a bowl and whisk until smooth and creamy but not too loose. Adjust with water if necessary. Combine this mixture with the drained aubergine pulp and mix thoroughly together with a spoon. Season and adjust the lemon.
Mix the tomatoes into the lentils and stir in the red pepper, harissa, squeeze in the lemon juice and season to taste. Finally mix in a good handful of the chopped herbs and maybe some more olive oil. Spoon out onto a large serving dish. To finish: spoon the babaghanoush over the top and drizzle with a little more oil.
mark bader photography
Labels:
aubergine,
babaghanoush,
lentils,
mediterranean,
tomato
17 November 2011
7 September 2011
Golden Nuggets
I was researching some veg recipies for an event I am doing for Riverford Organics this weekend and I stumbled across these carrot fritters in the lovely new vegetarian cook book 'Vegetarian' by Alice Hart. I have very slightly modified them, in that I used fresh mozzarella instead of halloumi in these ones which created nice soft bubbles of cheese but I will revert to halloumi at the weekend for it's salty overtones. Great as a vegetarian starter or as a side dish.
Carrot and Coriander fritters
Serves: 4
- 4 large carrots, grated
- 4 spring onions finely chopped
- Small bunch of coriander leaves chopped
- 2 tsp coriander seeds, toasted and crushed
- 20g gram flour
- 1 beaten egg
- 50g Halloumi grated
Heat some oil in a large frying and gently fry the fritters until crisp and golden. Remove from the pan and put on a warmed plate with some kitchen paper to absorb any excess oil. Serve with a squeeze of lemon and a drizzle of olive oil.
21 August 2011
Fighting fish
One of the very first photographs I had taken as a kid was of my little brother Jon, maybe aged 6 years old, standing outside our holiday home in Rustington, West Sussex, proudly holding in his outstretched hand, the catch of the day, a Mackerel!
A year or so before this momentous picture had been snapped my father surprised us all and I dare say himself, by returning from an unlikely visit to the London boat show with a boat strapped to the roof of the car. Not any old boat and if Ikea had been in existence back then they surely would have been green with envy for having not thought up this little gem, a flat packed self assemble boat! It was indeed a wondrous thing and we wondered over the instructions in true Ikea style for a whole winter, slowly and steadily wiring plywood panels together, taping up the seams with fibreglass tape, and fastidiously varnishing all the woodwork with the very exotically named ‘international’ boat varnish, until sometime around Easter as far as I can remember the vessel was finally wheeled out of the garage and stood magnificently on the driveway, now all we needed was some water. Surrey not being noted for its coast (although it does have a ‘coastal cruising society’) we headed for Littlehampton and the Arun Yacht club. Membership cards singed we would spend the next decade of our lives very happily mucking about on boats.
Mostly our boating pursuits would entail freezing cold forays into the English Channel to race 20 or so other boats around cleverly placed buoys whose intention was to test ones seamanship to the utmost. As kids we thoroughly enjoyed the challenge and we would try to (actually we often did) win these races or regattas and claim both the accolade and applause from the clubhouse as well as a tiny little wooden shield. On occasion and when the weather was clement we would strap an outboard motor to the stern of the boat, leave the sails folded neatly in their bags and head out into the channel for a spot of fishing, we kept a simplistic fishing kit, a bucket with two or three Mackerel lines in it. These lines with their brightly coloured dancing feathers would be cast off and left to their own devises for a while, we would probably eat a sandwich and then excitedly haul the lines into the boat and every once in a while we would be treated to a string of fish, often just one, more often just none, but it kept us kids entertained, and cold!
Nowadays I don’t have to go to quite the same lengths to gather one of my favourite fish and living only 20 miles from where these momentous events took place some 30 years ago I am in a perfect spot for Mackerel. No, a quick 10-minute cycle along the seafront here in Brighton is all that’s required and I have the full treasures of the sea laid out neatly on ice and for the taking.
Mackerel is a proper fish, it may not be everyone’s cup of tea, but it is quite probably the fish I eat more of than any other, lets hope it remains sustainable and cheap! To begin with it’s a real looker, dark and broody with flashes of silver and tiger stripes, it’s flesh is succulent and oily, it’s bones are substantial and easy to deal with. As with most fish there really isn’t that much to cooking them and Mackerel couldn’t be easier. These were pan fried, skin down in a little oil, two minutes and the skin is crisp, flip them over for a further minute and that’s it. What you serve them with is entirely a different matter, but I like to keep it simple and this Salsa Verde is a perfect partner for this glorious fish.
Salsa Verde
- Handful of mint leaves
- A bunch of Dill
- Handful of flat leaf parsley
- 2 tsp of capers (in brine)
- 1 anchovy fillet (in oil)
- 2 garlic cloves
- Salt & pepper
- 200ml extra virgin olive oil
- 1 lemon
Place all the ingredients in a blender and blitz to a coarse consistency, adjust seasoning and add a squeeze of lemon juice to taste.
17 August 2011
Simple pleasures # 4
This must be the easiest way to make a fruit cake , everything in one bowl, mix, bake for an hour, done !
It'll keep well for a week, we just took a few of these with us on a camping trip. Ideal for hungry campers sitting around the fire.
- 240g fruit ( or fruit & nuts) i used apricots, raisins, sultanas and almonds
- 100g soft butter
- 100 g caster sugar
- 2 large eggs
- 175g self raising flour
Put everything into a large bowl, mix into a smooth creamy cake mixture, put in a lined & buttered tin, sprinkle with nuts and sugar, bake at 180 degrees for an hour.
21 July 2011
Simple pleasures # 3
Broad beans & pecorino sardo salad
I had this in a restaurant in Florence this summer, on the menu it was translated as ' pecorino and green pods' , it wasn't until it came to the table that the true identity of the 'green pods' came to light. What a beautifully simple rustic dish.
Labels:
broad beans,
Florence,
Italy,
pecorino,
simple pleasures
14 July 2011
11 July 2011
Simple pleasures # 1
20 June 2011
All clammed up
There has been a fair amount of debate recently, both in the press and in my mind as to the ultimate recipe for Spaghetti alla vongole, a subtle, light and yet flavoursome pasta dish favoured in Rome and perfect for a summer lunch. It has always been a favourite of mine. I love its ease, simplicity and salty seaside tones. Spaghetti alla vongole (although I actually prefer Linguine) couldn’t be easier to make, clams which have been briefly cooked in white wine, olive oil, garlic and the merest hint of chilli, tossed with al dente pasta and sprinkled with some flat leaf parsley, what could be simpler? As with all things in life though, what sometimes appears to be simple on the surface is surrounded by deep complicated undercurrents of debate and this beautifully simple dish falls victim to that theory. The area of contention is Tomato, the purist’s: a team I’d like to consider myself as a member, will rightly debate that there is no room for the tomato in a vongole whilst there is another camp that will of course argue the complete opposite. Felicity Cloake in the Guardian writes an article each week on ‘how to make the ultimate’ and last week her ‘ultimate’ was vongole, therefore this argument was brought to a conclusion that neatly coincided with my return from a trip to Rome where this dish was on the roster, several times. It is therefore, with a raft of knowledge and on-the –ground experience, I can now reveal … bianco is best! Not that I needed Felicity or anyone else to persuade me on this as my natural bent is towards the pure. I have often had a version of this dish that includes a couple of cherry tomatoes and the sweetness they impart can on occasion be very palatable. Not so when a rich unctuous tomato sauce swamps the subtle salty offerings of the naked clam, this is definitely a no vote. In this case a mussel is a far better vehicle for a sweet sticky sauce.
When in Rome, as they say, and I was, I did indeed do what Romans do and indulged in Vongole as often as I could. Ristorante 34 nestles in a side street just off the Prada, Gucci, and Valentino mecca of via condotti. Surprising for it’s location this simple little trattoria offers some pretty good dishes, the vongole is my favourite and indeed is one of the best you can have outside of your own kitchen, aside from the oddly shaped ‘clam’ dish it was served on, a plain white round would have surpassed, but there lies another whole area of debate we won’t go into right now. Perfectly cooked pasta (you’d really expect nothing less but are often surprised) and generous helping of clams bound in a wine, garlic and parsley coating with the exact amount of chilli required to give this dish a delicate and graceful lift makes this the perfect meal for sitting at one of the little street-side tables gazing at the glamorous shoppers passing by clutching at glitzy carrier bags, the Prada carefully placed in full view.
There are many recipes but my own (with Linguine) concurs with Felicity Cloake’s ultimate version, so here it is.
Serves 4
- 500g small clams (palourdes, or carpet shell are ideal)
- 350g Linguine (dried)
-
30g butter
-
2 tbsp extra virgin olive oil
- 3 fat cloves of garlic, finely chopped
- ½ medium-hot red chilli, finely chopped
- 100ml dry white wine
-
Small bunch of flat-leaf parsley, roughly chopped
- Zest of ½ a lemon and a spritz of juice
1. Rinse the clams in cold running water, and scrub if necessary, then put them into a large bowl and cover with cold water. Salt generously and leave for a couple of hours, then drain and rinse well to remove any grit or sand.
2. Put the linguine into a large pan of salted boiling water and cook for a couple of minutes under the recommended time, until nearly done.
3. Meanwhile, put half the butter and all the olive oil in a large pan over a medium heat and soften the garlic and chilli.
4. Add the drained clams, and turn up the heat. Pour in the wine, cover and leave for a couple of minutes until most of them have opened. Discard any that are still closed. Add the others to the sauce, picking a few out of their shells for variety.
5. Drain the linguine and add to the pan along with the remaining butter. Toss well and leave for a minute, then stir through the chopped parsley, lemon zest and juice, season to taste and serve.
1 April 2011
Spring driven thing
A couple of items turned up in my veg box this week that strictly aren’t in season, but given that Riverford have organic farms both in the south of France and in Spain, the growing season is somewhat extended. Anyway I’m not complaining as I happen to love both of these vegetables and they inspired a springtime salad of autumnal veg, if you get my meaning. Juicy sweet butternut squash and delicate aniseed fennel, what a great combination, add a little mint and some nutty flavoured dressing, perfect. This is super easy, can be prepared in advance and then just thrown together. It makes a lovely stand-alone lunch or goes perfectly with some grilled fish, try some fresh Mackerel!
Butternut squash, fennel & potato salad
Serves: 4
- 1 x butternut squash
- 2 medium sized fennel bulb
- 300g potato
- 100g walnuts
- 8 mint leaves
- Rocket & watercress leaves
- Lemon juice
- 3 tbsp olive oil
- 2 tsp Sesame oil
- Brown rice vinegar, a dash
- Salt & pepper
Peel & deseed the butternut squash, cut into small 1-2cm chunks. Plunge into boiling water and blanch for a few minutes to soften. Drain and set aside. Similarly cut the potato (you can leave the skin on , especially if using small new potato) into small 1-2cm chunks and again blanch these in boiling water to soften, drain and set aside. Cut the fennel bulbs in halve and steam (place in a colander above the boiling potato is a good idea) until just getting tender. When the fennel is done, remove from the steamer and slice across the bulb into thick slices, set aside.
Heat a large frying pan, add some olive oil and quickly brown the chunks of butternut, potato and fennel in small batches until crisp and coloured, set aside on kitchen paper. Brown the walnuts until crisp and golden and again set aside.
In a large salad bowl mix the sesame oil, brown rice vinegar, tbsp olive oil, salt, pepper and lemon juice together to form a dressing, taste and adjust seasoning as desired. Place butternut, potato, fennel and walnuts in the bowl so there is a nice balance of ingredients, add the rocket and watercress leaves and tear some mint leaves into the bowl. With a spoon mix & toss everything together until it is all coated with the dressing, add another squeeze of lemon juice, adjust seasoning and serve.
Labels:
butternut squash,
fennel,
potato,
riverford organics
19 January 2011
Between the sheets
Saturday night, 10 o’clock, dinner over, the x-box is working overtime in the bedroom, three boys are full-bellied and playing out the rest of the evening, we are sipping on some red wine and slipping the last of the plates into the dishwasher, wrapping the remaining portion of lasagne for a Sunday night leftover meal. Its simplicity never fails to please, the lasagne that is, it’s warming, wholesome and fulfilling. What could be a better meal for a bunch of ever-hungry teenagers or adults? This simplistic dish however, takes a little forethought and planning to serve it at it’s very best. Let me take you back 24 hours to Friday night. The ragu, meat sauce, has been gently bubbling away for over an hour on the stove and will continue in its murmurings for another hour more until it is dark, thick and concentrated. The ragu is then put to one side to cool and left overnight, it'll intensify and mature in flavour as it marinates in it's juices until required for spreading between the pasta sheets, drizzled with bechamel sauce and baked in the oven to make the perfect lasagne.
It’s quite ritualistic making this sauce, almost therapeutic. Maybe because as a young adolescent cook it would have been one of the first recipes I attempted and over time, as I have matured in years and in my cooking ability so this simple sauce has matured and developed with me. I certainly have a particular way of constructing a ragu, it can be quick and easy in its preparation but I like to take my time over it, sipping some wine, listening to some music as I carefully chop, stir and taste: very considered and rigid in its simple ingredients, I rarely deviate from the path. I have experimented with different meats: pork, beef, or a mixture, I have added chicken livers, red wine, white wine, used fresh tomato and tinned, played around with various herb combinations but I have now decided that this sauce is the one. It may not be traditionally Italian and may not be as ‘mama’ would make (although in our household 'papa' always made the lasagne) but this recipe delivers a big rich flavour and smells terrific as it simmers gently in the kitchen, as yet I haven’t had any complaints. It is after all a very basic sauce but it's so worthwhile taking some time over it and using the best ingredients to make this lasagne recipe, as we all know ... it's what goes on between the sheets that really matters !
Lasagne al forno
Serves 6
- 500g lean, top quality minced beef
- 1 onion
- 2 celery sticks
- 1 large carrot
- 2 cloves garlic
- 1 tbsp thyme leaves
- 2 bay leaves
- 300ml chicken stock
- 100g tomato puree
- 1 glass of red wine
- 1 tsp sugar
- 1 tsp red wine vinegar
- 2 x 400g tins of tomato
- Salt & pepper
- 2 tbsp olive oil
- 8 lasagne sheets
- 50g parmesan cheese for grating
Béchamel sauce
- 600ml warm milk
- 50g butter
- 100g cheddar cheese
- 1 tbsp flour
I always use, where possible, organic vegetables and home made stock. Use an organic stock cube if you don’t have home made. I use the best tined tomato I can afford and a good full-bodied red wine, this is a large glass, about 1/3 of a bottle, cheers!
Mise en place: everything in place. When preparing a recipe I like to have everything in place, all my ingredients lined up, chopped, sliced, crushed and ready. So begin by finely chopping the onion, carrot, and celery, thinly slice the garlic, warm the stock, grate the cheese, strip the leaves from the sprigs of thyme and pour the wine. In a large sauté pan gently soften the onion, carrot, celery and garlic in a little olive oil and cover, slowly soften without browning for 6 minutes or so and then turn the heat up slightly and carefully crumble the minced meat into the pan. Mix well so the meat starts to colour evenly then season with a little salt & pepper. Cook for about 5 minutes. Add the thyme and bay leaves, the red wine vinegar and the sugar, cook for a few minutes longer until the vinegar has evaporated. Now add the tomato puree, mix well and add the red wine. Turn down the heat and cook for a while more until the wine is reduced and is barely remaining. Add the tinned tomato and the stock, stir well and turn the heat down to a slow simmer, the lowest setting you have, a very gentle lazy bubble.
The ragu now needs to cook very slowly, a couple of hours, but you need to keep an eye on it and care for it through the cooking process, stirring every now and again and topping up with a little more stock, wine or water if more liquid is required and carefully adjusting the seasoning. When it is cooked it’ll be a thick, concentrated rich meaty sauce. This can now be left in the fridge ready for the next day or freeze it for another time. When it comes to making the lasagne, re-heat the meat ragu gently to loosen, as it would have solidified somewhat in the fridge.
I always pre-cook my lasagne sheets. The ‘no pre-cooking required’ sheets that can be obtained always feel a bit stodgy and tough to me. So I use good quality dried lasagne sheets, pre cooked in boiling salted water for a few minutes and laid between tea towels until I need them.
For the white, béchamel sauce, gently melt the butter in a pan, remove from the heat when bubbling and stir in the sifted flour until smooth, return the pan to the heat and let the flour ‘cook-out’ in the butter until it is puffy, stir all the time, don’t let it burn. Remove the pan from the heat; gently and gradually stir in the warm milk until you have a velvety smooth sauce the texture of double cream. Return to the heat and cook gently, stirring all the time until the sauce thickens, you can add more milk if required but I like the end result to have a consistency of custard. Season the sauce with salt & pepper then stir in the grated cheese.
Now simply layer up all the elements but start with a thin layer of the ragu and some of the béchamel in the bottom of your ovenproof dish. Then a layer of lasagne sheets, some more ragu, more béchamel, lasagne and so on for four or five layers, pour the remaining béchamel all over the top to ‘seal’ and grate the Parmesan cheese evenly over. Place on a tray and in a medium oven, 180 degrees, for 30 minutes or until browned and crisp on the surface and bubbling around the sides of the dish.
2 January 2011
How about it sweet cheeks
There is, it has to be said, a quietly indulgent sense of self-satisfaction that derives from the creation of something outstandingly delicious from the most meagre & humble of ingredients. Champagne flavour with a beer budget and there could be no more a humble ingredient than the long forgotten beef cheek. I was in Waitrose the other day and I was surprised to see some lovely looking beef cheeks at the butchers counter. The cheeks weighed in at a very respectable £4.35 (£4.49 per kg as of 4/01/2011) for nearly a kg of meat enough for four or five very generous portions. It’s so refreshing to see a supermarket stocking obscure cheap cuts of meat again. I just hope they remain cheap and affordable and not, as is all to often the case, becoming a trendy gastro menu item pushing up demand and therefore the price: as with pork belly for instance.
I remember as a child my mother and father would prepare family dinners that would often comprise of cuts such as beef brisket: salted and turned for two weeks in the larder (yes, we had a larder a rare commodity these days) and then boiled and served with carrots. Lamb breasts: rolled and roasted with lemon and thyme stuffing, resulting in crispy lamb skin with an oozing and succulent interior or tender juicy ox tongue served with the creamiest mashed potato, wilted spinach and served with a gorgeous piquant gravy, lambs kidneys served with rice, sautéed chicken livers and other offally delights. There is something quite unique and special about these dishes, a richness and depth of flavour that to my mind far outstrips an expensive fillet steak, topside or pork leg any day. These cheaper cuts pack a big flavour, some interesting varied textures and allow some slow, considered and indulgent cooking. Sainsbury's have been selling Lamb breast for a while now and with Waitrose stepping up the game with items such as shin, skirt and cheeks it won't be too long before the others follow suit. In the meantime there are enough farmers markets, farm shops and even a renaissance for the high street butcher, here in Brighton we actually had a new one open fairly recently. You can buy excellent meat online ( although I'm a bit funny about seeing what I'm buying when it comes to meat ) Donald Russell sells beef cheeks but at a top end price of £13.75 per kilo: see what i mean about these cuts getting expensive. So get down to your local butcher or farm shop and snap up some of these sweet little cheeks before they start to leave a bitter taste in your wallet.
Beef cheeks can be used in various ways but for this recipe I cooked them as if in a daube provencale or a bourguignon style. I kept the meat in large pieces; I didn’t trim out the fat or sinew so the fat slowly melts, flavouring and tenderising the meat as it cooks. I just cut the cheeks into four or five portions and marinated the meat for 24 hours before cooking. Slow cooked for four hours in red wine and meat stock (I used venison), carrots, onions and my secret ingredient, a little star anise, the result was fantastic: mouth-watering flavour that had depth and richness, the meat was soft, tender, succulent and extremely delicious. Pop this dish in the oven, prep your vegetables (creamed parsnip and peppered steamed cabbage in this case) and head off for a brisk wintry walk or to the pub for a couple of beers. Returning home a few hours later you’ll find the house filled with warm beefy aromas and in no time an indulgent lunch will be on the table and it would have cost less than a couple of pints!
Beef cheeks daube style
Serves:4- 800g beef cheeks
- 3 medium onions sliced
- 4 large carrots cut into batons
- 1 celery stalk finely chopped
- 1 small leek finely chopped
- 2 rashers of bacon finely chopped
- 2 garlic cloves
- 3/4 bottle of red wine
- 600ml meat stock
- 4 tbsp flour
- Thyme sprigs
- 4 Bay leaves
- 10 juniper berries, crushed
- ½ a star anise
- olive oil
- salt & pepper
Once cooked this dish will improve with age, make it the day before and reheat gently before serving.
Serve with creamed parsnips and a green vegetable.
4 November 2010
Crunch time
Yes it’s that glorious time of year where everything gets just a little bit crunchy. The trees are changing colours and soon we’ll be wading through pavements and fields knee deep in crisp golden leaves, clear blue skies overhead and clouds of condensing breath in the air. The seasonal produce on offer from stores, markets and farm shops reflect the colours and hues of the season: golden and purple swedes, burnt orange pumpkins, moss-like kale leaves, frosty white leeks and deep green crinkled cabbage. It’s the time of year when traditionally our thoughts turn, quite rightly, to warming soups, stews, compotes and deep rich meats and game with distinctive earthy flavours but there’s still time for something a little lighter and fresher. In this crisp and crunchy salad-come-autumnal-coleslaw you'll find a refreshing, tangy, Asian twist that is the perfect compliment to the season.
Try adding bean sprouts, noodles or both, maybe some stir fried crispy chunks of chicken or serve this coleslaw, as is, along side some roasted pork belly with crackling. The dressing would make a perfect marinade for fish too: sticky, sweet and sour.
Winter coleslaw with Asian dressing
Serves:4
- ½ a cabbage, green or white shredded
- 3 carrots coarsely grated
- 2 apples grated
- 1 red pepper finely sliced
- 2 tbsp of crushed roasted peanuts
Dressing
· 1 clove garlic crushed
· ½ onion finely chopped
· 1 red chilli chopped
· 1 tbsp of thai fish sauce
· 11/2 tbsp of brown sugar
· 3 tbsp of lime juice
· a dash of sweet chilli sauce
Put all the raw vegetables chopped, sliced or grated in a large bowl. Mix all the dressing ingredients in a blender and blitz for a few seconds. Pour the dressing over the veg and toss well, serving with a sprinkle of the crushed peanuts.
2 November 2010
Smashing pumpkins
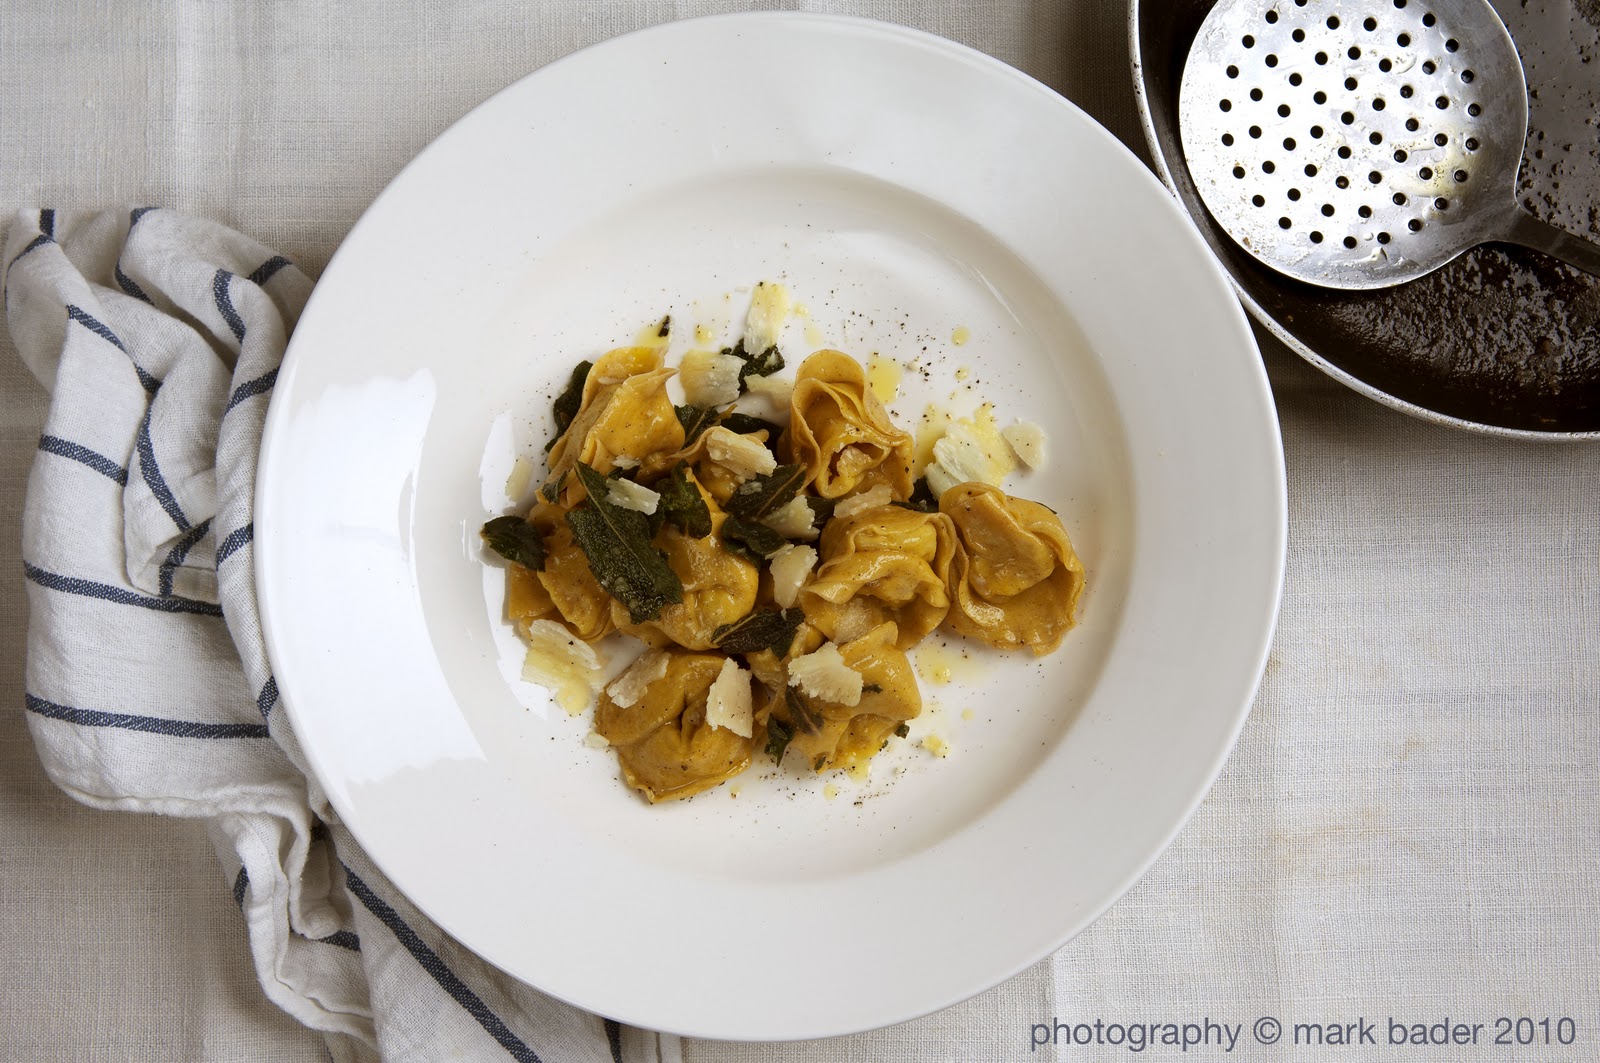
Halloween having just passed we naturally find ourselves with a slight excess in the pumpkin department: even though the living room is abundantly decorated with triangular cut, slanty eyed faces that the kids have enthusiastically carved, glowing and glowering, on shelves, mantles and in obscure corners, the room is filled with an autumnal aura … and an acrid smell of burning vegetable flesh. Every year I try to ‘do’ something with pumpkin, I’ve experimented with pumpkin pies, pumpkin soups, roasting and mashing the golden flesh, but have come to the conclusion that none of the above really excites me that much. Pies are often glutinous and any pumpkin flavour is masked by nutmeg and cinnamon, not a bad thing as it turns out, but then I question as to why include the pumpkin in the first place. Soups are never quite ‘there’ for me: I only once had a decent soup but again the over riding flavour was celery this time, whilst warming and an attractive colour the pumpkin seemed to be lurking around rather than bursting out. Lets face facts, pumpkin isn’t the worlds most flavoursome ingredient: despite being one of the most popular crops in the United States of America where about 1.5 billion pounds are cultivated each year. It does however have quite an interesting texture if handled in the right way and this year I stumbled upon a pasta recipe that seems to finally do the pumpkin proud. The trick is to roast thick slices of pumpkin with the skin intact then, when tender and almost cooked through, scrape the flesh into a sieve or colander and let it drain and dry overnight (for at least the best part of the day). The true genius in this recipe though is the way the pumpkin flesh, now mashed coarsely, is combined with pear and parmesan cheese and a little garlic to create a tangy, sweet, textured and delicious filling for tortellini pasta. Squash and pasta are old and well acquainted partners; think of butternut and sage for instance, both as a filling and as a fantastic variation for gnocchi. This recipe for the pumpkin is similar in the fact that the dish is finished with a smoky sage and butter sauce but the texture and the fresh fruity finish are quite unique.
Pumpkin & pear tortellini
Serves: 4
For the filling- the day before
- 1 pumpkin, about 2kg
- 100g grated fresh parmesan cheese
- 100g pear flesh, grated
- 1 clove garlic, crushed
- Salt & pepper
For the pasta
- 300g tipo ‘00’ flour
- 3 eggs
- 1 tspn of turmeric
For the sauce
- 100g butter
- A handful of sage leaves
- Half a cup of vegetable stock
There are so many pasta recipes so find one you can work with, the process and technique is pretty standard, I add the turmeric to give the pasta a deep yellow colour. Fill your rolled out pasta with the pumpkin filling, shape into tortellini and leave to air until needed. Cook in plenty of boiling salted water for about 4 mins. Melt the butter in a frying pan; add the sage leaves and fry for a minute, splash in the stock and season. When cooked toss the tortellini in the sage butter sauce and serve immediately.
27 October 2010
Riverford at Pines Gardens
Dover, Kent was the location for the latest demonstration for my friends at Riverford organics , the veg box people. Once again we were inspiring new ideas and some innovative methods of cooking some of the , well , less exciting veg that heralds in the new autumn season, the much maligned Swede for instance. Autumn also has a treasure-trove of delights in store and is quite possibly my favourite food season. Much as in spring when purple sprouting broccoli is available for the first time , Kale brings a similar frisson of excitement with it's arrival in the weekly box. This week it was the deeply gorgeous long leaves of Cavalo Nero but soon curly Kale will be in abundance and I shall indulge.
The main focus of this weeks demonstration was Swede though and sage seemed to be the appropriate partner. Try roasting Swede seasoned with salt and pepper, some chopped sage leaves and roasted in the over for 20 minutes or so and serve as an alternative to roast potato. Using a very similar method , only chopping the Swede into more delicate pieces a risotto of roasted Swede and sage butter drizzle was a real hit with both lovers and haters of this golden and fleshed root.
Roast Swede and sage risotto
Serves: 4
- 250g Arborio rice
- 750ml Vegetable stock
- 3tbsp olive oil
- 1 white onion finely chopped
- 1 celery stick, finely chopped
- 150g grated parmesan cheese
- 1 garlic clove crushed
- 1 lemon juiced
- 1 glass of white dry wine
- 30g butter
- Salt & pepper
Heat the oil in a heavy based pan and gently fry the onion & celery for a few minutes. Add the crushed garlic clove stir in for a minute or two and then pour in some more olive oil and add the rice. Cook the rice for a few minutes until the rice absorbs some of the oil and starts to puff a little. If you are using wine this is the time to add it to the pan and heat until absorbed into the rice. Now start adding the stock, just cover the rice and stir whilst it is absorbed and then repeat. Keep cooking until the rice is nearly done but still a bit ‘husky’ and now add the lemon juice, season with salt & pepper and keep cooking adding more stock as required until the rice is al dente. Remove from the heat, stir in the Parmesan cheese cover and let it sit for five minutes, before adding flavourings.
Roasted Swede & sage:
- 1 medium Swede
- a handful of fresh sage leaves
- a few spinach leaves , washed and dried
- olive oil
Event photos by Chrissy Asteraki-Speer
6 October 2010
Humble roots
We had a bit of a glut this week, Carrots, that most humble of root vegetables, they seemed to be everywhere. We hadn’t even started on the bunch that came in last weeks veg box when another bunch turned up all fresh and perky in this weeks offering. There were a few still left over from the week before and in a major failing of my faculties I actually bought yet more whilst out food shopping; just because they were the right shape, you know those delicious little baby Chantenay carrots, I wanted them for a version of Coq-Au-Vin I was cooking mid week and thought they’d look good in the dish. So due to this slight over run of the gloriously humble Daucus carota I found myself searching around for a few recipes to appease, not only my shopping guilt but the excess.
There are of course many ways to cook a carrot and nothing better than to boil until just tender, drain and then glaze with butter, a little sugar and serve sprinkled with fresh chopped Parsley. We call these ‘naughty carrots’ at home and in a stroke of genius and by employing a degree of psychological warfare the kids were wooed into eating them by simply designating them as ‘naughty’ (due to the sugar & butter content), all kids like something naughty and this system worked a treat and we still refer to this dish by the same name today. In an aside to this: we once convinced my son, probably aged two (poor lad had no idea) that sparkling mineral water was ‘white coca-cola’, another battle won by simple psychological techniques, worked until he went to nursery school and started mixing with other better informed children who were already indoctrinated in the delights of ‘the real thing’!
There is always a soup I suppose, a classic way to relieve oneself of an overflowing supply of vegetables, but today I fancied something a little more tantalising and something to accompany some slow roasted lamb shoulder that was oozing and spitting in the oven. I was thinking of a Greek flavour or an exotic North African spicing that would go perfectly with the lamb. Once again Ottoleghi’s Plenty came to the rescue with a very simple Moroccan spiced carrot recipe that I instantly suspected could be adapted in several ways. The basic idea was simple, we like that, par-cook the carrots, fry some onion and spice these with cumin, cinnamon, ginger, cloves, chilli and garlic, return the carrots, stir together and eventually serve with some fresh coriander and an indulgent dollop of Greek yoghurt drizzled with your best olive oil.
Serves: 4
In a frying pan soften the onion in olive oil until just starting to colour, sprinkle in all the ground herbs, the chopped garlic, finely chopped chillies, white wine vinegar and lemon zest and continue cooking for a few minutes until all the flavours are combined and the onion is browned and golden.
Return the carrots to the onion mixture and mix thoroughly so all the carrots are coated in the onions and spices. Remove from the heat and allow to cool. Just before serving stir through the chopped coriander and serve in individual bowls with a spoon of Greek yoghurt and a drizzle of olive oil.
I was cooking at a music festival the other week and used this basic recipe to create a couscous dish that could be pre-prepared and taste good all day. It turned out to be a real hit and I have prepared it a few times since. It follows the same basic principles as the Ottolenghi dish above but combines couscous, mint & raisins to make a sweet and spicy warm (or cold) salad that is great as an accompaniment to meats or is an ideal lunch box recipe.
In a frying pan soften the onion in olive oil until just starting to colour, sprinkle with all the ground herbs, the chopped garlic, finely chopped chillies and continue cooking for a few minutes until all the flavours are combined and the onion is browned and golden.
There are of course many ways to cook a carrot and nothing better than to boil until just tender, drain and then glaze with butter, a little sugar and serve sprinkled with fresh chopped Parsley. We call these ‘naughty carrots’ at home and in a stroke of genius and by employing a degree of psychological warfare the kids were wooed into eating them by simply designating them as ‘naughty’ (due to the sugar & butter content), all kids like something naughty and this system worked a treat and we still refer to this dish by the same name today. In an aside to this: we once convinced my son, probably aged two (poor lad had no idea) that sparkling mineral water was ‘white coca-cola’, another battle won by simple psychological techniques, worked until he went to nursery school and started mixing with other better informed children who were already indoctrinated in the delights of ‘the real thing’!
There is always a soup I suppose, a classic way to relieve oneself of an overflowing supply of vegetables, but today I fancied something a little more tantalising and something to accompany some slow roasted lamb shoulder that was oozing and spitting in the oven. I was thinking of a Greek flavour or an exotic North African spicing that would go perfectly with the lamb. Once again Ottoleghi’s Plenty came to the rescue with a very simple Moroccan spiced carrot recipe that I instantly suspected could be adapted in several ways. The basic idea was simple, we like that, par-cook the carrots, fry some onion and spice these with cumin, cinnamon, ginger, cloves, chilli and garlic, return the carrots, stir together and eventually serve with some fresh coriander and an indulgent dollop of Greek yoghurt drizzled with your best olive oil.
Moroccan spiced carrot salad
Serves: 4
- 1 kg carrots
- 100 ml olive oil
- 1 onion finely chopped
- 3 cloves of garlic
- 2 green chillies
- 1 pinch of ground cloves
- 1 pinch of ground ginger
- 1 pinch of ground coriander
- 1 tsp of ground cinnamon
- 1 tsp sweet paprika
- 1 tsp ground cumin
- 1 tbsp white wine vinegar
- 1 tbsp of chopped preserved lemon skin (if you have it or the grated zest of a lemon
- Juice of 1 lemon
- 1 handful of fresh chopped coriander
- Greek yoghurt to serve
- Salt & pepper
In a frying pan soften the onion in olive oil until just starting to colour, sprinkle in all the ground herbs, the chopped garlic, finely chopped chillies, white wine vinegar and lemon zest and continue cooking for a few minutes until all the flavours are combined and the onion is browned and golden.
Return the carrots to the onion mixture and mix thoroughly so all the carrots are coated in the onions and spices. Remove from the heat and allow to cool. Just before serving stir through the chopped coriander and serve in individual bowls with a spoon of Greek yoghurt and a drizzle of olive oil.
I was cooking at a music festival the other week and used this basic recipe to create a couscous dish that could be pre-prepared and taste good all day. It turned out to be a real hit and I have prepared it a few times since. It follows the same basic principles as the Ottolenghi dish above but combines couscous, mint & raisins to make a sweet and spicy warm (or cold) salad that is great as an accompaniment to meats or is an ideal lunch box recipe.
Moroccan spiced carrot couscous
Serves: 4
- 1 kg carrots
- 150g couscous
- 100ml olive oil
- 1 onion finely chopped
- 3 cloves of garlic
- 2 green chillies
- 1 pinch of ground coriander
- 1 tsp of ground cinnamon
- 1 tsp ground cumin
- Juice of 1 lemon
- 1 handful of fresh chopped coriander
- 1 handful of fresh chopped mint
- 1 handful of the best raisins you can afford
- Salt & pepper
Wash, peel and cut the carrots into 1cm thick batons about 3 cm in length. Cook in slowly boiling salted water until just tender but retaining some degree of crunch. Drain and allow to cool.
In a frying pan soften the onion in olive oil until just starting to colour, sprinkle with all the ground herbs, the chopped garlic, finely chopped chillies and continue cooking for a few minutes until all the flavours are combined and the onion is browned and golden.
Return the carrots to the onion mixture and mix thoroughly so all the carrots are coated in the onions and spices. Remove from the heat and allow to cool.
Put the couscous in a large bowl, sprinkle with salt and cover with boiling water. Put a lid on the bowl or cover the bowl with cling film and leave to stand for 10 minutes. After ten minutes ‘fluff’ the couscous up with a plastic fork and drizzle in a little olive oil and lemon juice just to help the grains separate. Stir in the chopped mint and coriander, season to taste with salt & pepper and add more lemon juice if required. Now add the carrots and onion mixture and the raisins and stir all the ingredients together. Adjust the seasoning to taste, add more chopped herbs and lemon if required then place in into a large serving dish.
8 September 2010
Get with the Beet !
Second helpings are always a good thing and there is no exception in the case of the deeply delicious beetroot. Normally and probably quite rightly one associates the deep earthy flavours of this particular purple bulb with the autumn, but in fact these roots are available pretty much all year: bar a brief holiday from April till June. It therefore comes as a complete delight to find what appears to be a second crop available just now, but this is really the beginning of the season that began in late June and will now continue through till next February or even March. The beets available now are smaller, sweeter and cook more easily than those larger ones available in the winter month’s, which can sometimes have a tough woody core.

There are many ways to prepare and eat beetroot but I find the best place to start no matter what recipe I am intending to follow is to roast the beets in the oven until tender and from there I can do what ever I so desire with ease. I have noticed that many cook books instruct a roasting of around 45 minutes, this in my opinion is a complete fallacy, I can’t remember ever being able to roast a beet from raw to tender in this time, an hour and a half maybe, but never much less than an hour, so bear this in mind before starting any recipe involving beetroot.
My preferred method is quite simple, produces a deep rich colour, flavour and velvety texture, let alone a delicious aroma that will fill your kitchen making you instantly and ridiculously hungry. Simply remove most of the roots and stalks from the beets, scatter a good handful or two of sea salt on the bottom of a large sheet of foil, place the washed and dried beets onto the bed of salt, wrap the foil up tightly and place on a tray in a preheated oven at 180 degrees. As I said you can expect this process to take around 90 to 120 minutes depending on the size and age of your beets. You can always test them with a skewer after an hour and see how they’re doing. When completely tender, allow them to cool and then rub off the skins with your fingers ( wear some rubber gloves if you don’t want stained fingers) and trim off the stalks and roots.
Now you have a delicious cooked beet that can be added to salads, pan-fried with carrots and balsamic vinegar, made into deep velvety soup that can be eaten hot or cold and even used to make a surprisingly good, moist cake.
I am a huge fan of the beet and find it a complete joy to cook with. I love the way it partners so well with fruit and in these two recipes I do exactly that. The soup is a delicious alternative to Borscht, the apple lightens and sweetens and this version is equally good hot or cold. The salad is simply wondrous, tangy, salty (from the olives) and sweet from both the beets and the fruit. It looks quite stunning too and is super simple to make.
Beetroot , orange and olive salad
Serves: 2
- 400g beetroot
- 2 sweet blood or blush oranges
- 50g black dried pitted olives
- ½ a small red onion very finely chopped
- 1 tbsp red wine vinegar
- 3 tbsp olive oil
- Flat leaf parsley chopped
- Salt & pepper
Prepare the beetroot by washing, trimming off the long stalks and sitting them on a bed of sea salt wrapped up inside a piece of foil. Place them in a pre-heated oven at 180 degrees and roast for at least 90 minutes or until completely tender when pierced with a skewer or sharp knife. Allow to cool for a while, and then remove the stalks and skins, slice into wedge shape pieces and place in a large mixing bowl.
Cut the skins from the oranges by slicing off the ends and cutting down the sides of the fruit to reveal the flesh, thus removing any pith, cut out the segments of orange from in-between the membranes and put the segments and the juice in the same bowl as the beetroot.
Add all the other ingredients: olives, onion, olive oil, red wine vinegar and chopped parsley to the bowl, mix the salad together, season with salt & pepper to taste and serve on a large platter.
Beetroot, apple & celery soup
Serves: 4
- 1kg Beetroot (roasted)
- 500g Apples
- 1 large onion
- 1 Celery stalk
- 200ml white wine
- 1 tbsp Demerara sugar
- 1.5ltr vegetable or chicken stock
- 2tbsp olive oil
- Salt & pepper
- Crème fraiche
- Chives
Wrap the beetroot in foil and roast in the oven at 180 degrees for an hour or until tender, peel the skins off the beets and slice. Sweat the onion and celery in a large pan in a little olive oil. Peel, core and slice the apples add these to the pan and cook down for a while. Add the sugar, white wine and cook for a few minutes more until all the ingredients are combined. Pour over the stock, season and simmer gently until everything is thoroughly tender and cooked through: about 30 mins. Allow to cool for a little while and then place in a food processor and blitz into a smooth soup. Return to a pan, heat gently and then serve with a swirl of crème fraiche or sour cream and a scattering of finely chopped chives or dill if preferred. This soup is excellent served chilled.
Subscribe to:
Posts (Atom)